Snowball Marshmallows with Blue Plant Dye
Make these snowball-themed marshmallows with blue plant dye from butterfly pea flower. Rolled in coconut flakes with an optional peppermint oil addition for winter flavor. There's an outlined method creating dainty marshmallows for tea time, and another for the kids to make themselves.
Equipment
- 1 Heavy Bottomed Sauce Pot
- 1 Candy thermometer
- 1 9" x 11" Baking Pan
- Parchment paper
Ingredients
Butterfly Pea Tea Concentrate
- 1/4 Cup Butterfly Pea Flowers
- 1 Cup Water
Snowball Marshmallows
- 1/2 Cup Water
- 3 Tbsp. Organic Gelatin
- 1/2 Cup Water
- 2 1/4 Cup Organic Cane Sugar
- 1/2 tsp. Sea Salt
- 2 drops Peppermint Essential Oil Or 1/2 tsp. peppermint extract
Instructions
Make Butterfly Pea Flower Tea Concentrate
- Steep 1/4 cup of butterfly pea flower tea in 1 cup of boiling water. Allow to sit for at least 1 hour, or overnight.
- Strain out the botanical material and compost. Reserve the tea for the marshmallow recipe.
Prepare the Gelatin
- Place 3 Tbsp. of organic gelatin into the bottom of your stand mixer's bowl (or any large, heat-proof mixing bowl). Add 1/2 cup of water (you can substitute out more of the pea flower tea, if you'd like).
- Gently stir to be sure all the gelatin is submerged in the water. Allow it to absorb all the water and plump up - this process is called "blooming".
Make Snowball Marshmallows
- Prepare your pan with parchment paper to fit and completely line the pan for easy removal of the marshmallows when they're done. Also, get your candy thermometer ready*.
- Place 1/2 cup of butterfly pea flower tea, 2 1/4 cups of organic cane sugar, and 1/2 tsp. of sea salt into a heavy bottomed pan over medium heat. Mix slowly and consistently until the sugar melts.
- Heat the syrup to 238°F - 240°F (114°C - 116°) while slowly stirring the syrup to prevent scorching. Don't mix too vigorously or introduce air into the syrup. Use a candy thermometer to be sure of temperature. This usually takes 5-10 minutes.
- Using hot mitts to hold the syrup pot, have a helper turn the stand mixer to low while you slowly (so slowly) drip the hot syrup down the inside of the mixing bowl. Be patient and continue to drip slowly.
- Have your helper turn up the mixer one or two notches to speed up the mixing process as you continue to add more syrup. Hold the pot while your helper scrapes out the rest of the syrup into the bowl.
- Add peppermint essential oil or extract, if you're using it.
- Put the mixing collar on and turn the mixer up to high. You may need to use a kitchen towel to cover any openings in the collar to prevent splashing until the marshmallow begins to set up. Watch for the mix to bulk up, change color, and thicken.
- Once you have soft peaks, stop the mixer, bang off the whisk attachment to remove excess marshmallow, and QUICKLY put all the marshmallow fluff into your pan.
- Carefully bang the pan on the counter to level the marshmallow and smooth the top as much as you can. It will be quickly drying as you work, so just do your best.
- Cover with a mesh screen or parchment paper (don't let it touch the marshmallow) to air dry. I usually add a kitchen towel on top to keep out bugs and children. The longer they sit, the dryer the marshmallows will be.
Forming the Snowflake Marshmallows
- After the marshmallows have set up, pull up the parchment paper to remove them from the pan. Place on a cutting board and use a round biscuit or cookie cutter to cut out the "snowball" shape.
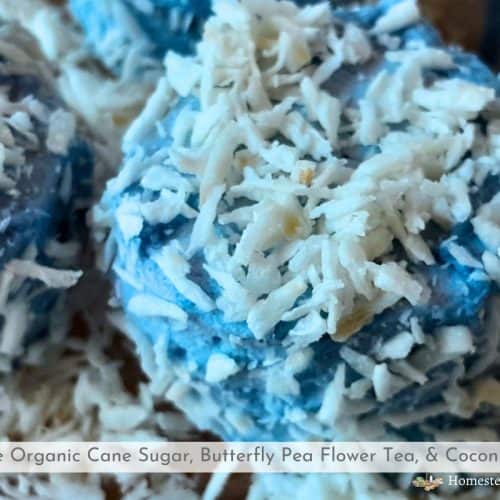
- Pull off the trim pieces and roll the snowballs immediately in coconut flakes. Place on a lovely plate and serve for tea.
For the Kids!
- Have the kids wash their hands and each pick up 2-3 Tbsp. of the marshmallow trimmings. Have them smoosh the bits into a ball as best they can. The snowballs will be a little shaggy and weird, but they'll look cool.
- Have them roll the marshmallow balls in the coconut and place on their own plate to serve to their friends.
Notes
*If you don't have a candy thermometer, get a small cup of ice water and place it close to your work area. One you've boiled the syrup and it has thickened, you can place a small amount of the syrup into the water.
- If the syrup forms a thread, it will be around the right temperature for soft ball candy, which is perfect for marshmallows. (See the graphic in the post to learn more.)
- If you don't have a stand mixer, be sure to use a helper so that you can pour while your helper slowly mixes.
- If you're making marshmallows by yourself, you can soak pots and utensils in water to loosen the sugar.
- The risk you run when you set aside the pot to cool down is that you'll forget about it or miss that golden moment when the syrup is still workable but not set up.
Tried this recipe?Let us know how it was!