Grapevine Garland
Equipment
- Bucket, optional
- Clippers
Ingredients
- Grape vines in various lengths a lot
- Zip ties or twine
Instructions
To Begin
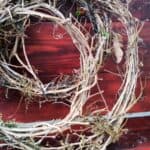
- Prune vines in long swaths, retaining interesting parts like curly ques, dried berries, colorful mosses, etc. The larger the grape vine finished garland, the more vines you need to cut. Hint: you always need more than you think, especially if the vines are still green and will shrink as they dry.
- Spray paint your zip ties, if you want to camouflage them more.
- Lay groups of three to nine vines out in sections in your yard. You’ll want a lot of space for this so they don’t tangle. When they do, inevitably tangle, remember not to use your pirate words in front of the children.
- Beginning with one group of vines, secure the ends together with a zip tie or twine. I prefer zip ties because they’re quick to close (unless you try to secure them backwards first, which I always seem to do) and they can be tightened after the drying process is complete.
- Repeat step three for every group of vines you have.
To Start Braiding
- Holding the end of your first group, divide the vines into three groups – they don’t have to be even. Roughly braid the vines in your group. Alternatively, for a shorter AND thicker garland, use three groups of vines and make a braid using one group of vines per strand of braid. This is a good option if you have a really big space or want to hang your garland up high where it will be more noticeable if it’s thicker. Caution: this can wear out your hands fast as the thicker braid will gain weight quicker than a thin one.
- As you come to the end of each group of vines and are finishing up your messy braid, open the end of the vines. It will kind of resemble a Pacman mouth.
- Insert the zip tied ends of the next group of vines. Shove it as far up as you can, tucking the ends and pieces in together so they next as much as possible.
- Use a few zip ties if you need to in order to secure these ends together.
- Repeat steps six through nine until you’ve used up all your groups of vines.
To Finish
- To finish the last group of ends, leave a one to two foot tail of unbraided vines. Gently bend the vine ends back up towards the main body of the grape vine garland, tucking them and weaving them into the body of the swag to hide and secure them.
- Lay out your garland and look for any vine ends or pieces that need to be tucked or even clipped. You may have broken a few and that’s fine – just clip the off or shove them back in.
- If you want your garland to dry straight, simply leave it lengthened on a dry surface for several weeks.
- If you want to give your garland some curl, securely wrap your garland around a bucket, water barrel or any other curved surface. Wind it until the garland is all the way wrapped around the bucket. I secure with zip ties as I go, but you can also use string. Make it tight. Leave in a dry place for several weeks.
- When it’s time to hang the garland, remove it from the barrel slowly and carefully. See how the grape vine garland naturally wants to hang – natural crafts have their own mind.
- Add ribbons, ornaments or greenery.